


Finding my flow in the snow. A wheelchair user's experience of sit-skiing.
Before my injury, I loved skiing and being on the mountain. I loved entering a flow state while on the mountain. But in the years after my injury, I tried to do the things I used to enjoy, and if I...

How adaptive hobbies support mental health and wellbeing for wheelchair users.
What I noticed. When I became a paraplegic in 2012, getting active wasn't the first thing on my mind. I was focused on recovery and figuring out how everything worked now. Trying not to feel like a...

Grocery shopping figured out. 8 tips from real wheelchair users.
Grocery shopping. It's one of those tasks that most people do on autopilot. For wheelchair users, it's rarely that simple. You're managing your chair, navigating aisles that weren't designed with ...

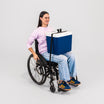
Wheelchair grocery shopping tips. How Mike and Gem do a quick shop.
Gem and I recently shared a comparison between accessible and regular shopping carts. But sometimes the shop doesn't call for a full shopping cart. When you're just getting the essentials, there's...

Comparing Wheelchair Accessible vs. Regular Shopping Carts
Grocery shopping in a wheelchair comes with real trade-offs. We break down the honest pros and cons of standard vs wheelchair accessible carts, so you can shop smarter and more independently.
Let's get to know each other.
Join us on social.